
|
Learning Long Exposure Photography - Part 2
In part 1 we talked about the key ingredient in long exposure photography, motion. We also discussed why this technique works, what equipment to use, and what environments to look for when getting started. As promised, here's my list of top tips to help you further your skills with LE shots. This list is by no means an exhaustive study in everything you need to know when shooting LE. Rather, these are the top things I think anyone experimenting with LE should be aware of.
Use low ISOLonger exposures exacerbate digital noise, so using a lower ISO helps reduce noise in the final product. ISO 100 or 50 is ideal. If you aren't familiar with image noise, Wikipedia has a great article on the subject.
Use Filters to Reduce Light, NOT ApertureSmaller apertures reduce the available light and increase depth of field. You might be tempted to use a really small aperture (like f/29, f/32, f/45) as a trade-off to getting longer shutter speeds. Unfortunately smaller apertures create diffraction of the light, and this leads to softer, almost blurry photos.
Read my other blog post on this subject to see examples of what this is and why it happens.
Avoid Too Much MovementThe movement can be relative between two subjects or absolute based on a single subject. Take the example shot below in New York City. The buildings don't move, the cab driving by is blurred enough to show motion, but the person walking by is far too blurry. Taken at 0.6 seconds, the only thing that was still during that amount of time was the foot, and the shot ended up with a ghost foot sitting on the sidewalk.
Watch Your TimingWhen you've narrowed down to a particular shutter speed but the shot doesn't quite work, give it another try. Pay close attention to the motion itself and the timing of your shot. This is especially true for people. Both shots below were taken with the same 1/5 second shutter speed but the 2nd one with slower skaters and people moving away from the viewer result in more solid figures with less blur.
Both shots at 1/5 second
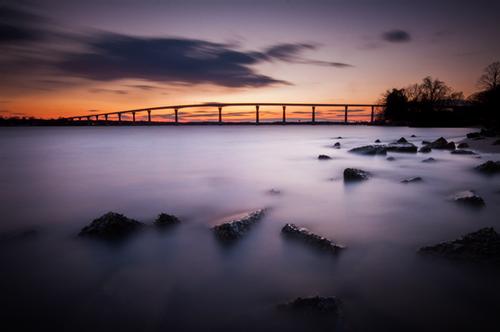
Use a GND Filter (or Fake It In Post-Processing)This shot is the longest exposure I'll share here. At nearly 8 minutes long, I was attempting to capture the cloud movement on a mostly gray morning. However, taken without a graduated neutral density (GDN) filter, the sky is so bright that the patterns in the clouds are almost lost. If you have a glass GND filter, learn to use it.
All that was needed to bring the sky back to life in post-processing was a single gradient filter, applied in Lightroom. This shot used a filter that decreased the exposure by 1 stop with a boost in contrast and clarity. You can't always do this in post because sometimes the sky is too bright and you'll blow out the whites (you get a bad case of the “blinkies”). In that case you'll never recover. Glass is best, but if you're careful you can accomplish a lot in post-processing.
Use HDR or Merged ShotsI have another blog post about merging two shots when using a GND just won't do. That technique along with HDR can be really useful with shooting LE. Sometimes the exposure range is just too great in a single shot, especially when you're trying to capture the sky when the sun is low on the horizon. In many cases, without a complex filter setup, the only way to create the shot is to combine multiple exposures together.
Work Fast!You may find that a lot of interesting subjects and environments are best captured in low light, during the blue and golden hour of the day. The trouble is that the light and color change very rapidly in those environments. When you're shooting 1, 2, or 5 minute exposures at those times, you can't afford to do many test shots before the scene completely changes and you've lost what you came for. Sometime you only have enough time to capture 2 or 3 shots before the scene is dead. So be prepared, know your equipment well, and use the next tip to maximize your results.
Shortcuts for Taking Test ShotsIf you're using an ND filter, it can definitely through off the through-the-lens (TTL) exposure calculation. You camera may tell you there's enough light at 30 seconds, but you may find that the desired exposure is somewhere closer to 2 minutes. And darker filters like B+W 3.0 and Lee Big Stopper make it virtually impossible to see through the lens with your eye in some situations. So shooting manual is the only way to go sometimes. If you're working in manual, unless you've got a lot of practice, you will probably need to take a test shot or two to determine what the proper exposure settings are. And you don't want to take 2, 3, or 5 minute “test” shots....that's a huge waste of time. Remember, every setting that controls exposure (ISO, shutter speed, aperture) change in a proportional manner. They all either double or halve the light captured. Let's assume for a moment that the ideal settings for a scene are ISO 100, f/8, for 3 minutes. A comparable test shot for this would be captured at ISO 3200, f/4, 1.4 seconds. You read that right, you can see if the shot will work with an exposure that's less than 2 seconds if you bump the ISO way, way up and open the aperture wide. Let me explain. Each step up in ISO doubles the light sensitivity. It also adds more noise but we don't care because this is just a test shot. In addition, opening the aperture allows more light in. Because you're increasing the sensitivity of light and allowing more light in, you can drop the shutter speed to a blazingly quick 1.4 seconds and get the same exposure. Here's the math: ISO 100 → 200 → 400 → 800 → 1600 → 3200 = 5 stops (the # doubles 5 times in a row)
|


 2 seconds, only a slight swirl |
 7 seconds produces a clearer pattern |
Similarly, all these photos of a Ferris wheel are taking in a 1 minute period, with exposures ranging from 1 to 4 seconds in length. The changing lights on the ride combined with various shutter speeds result in an almost infinity number of patterns and colors.

Watch Out for Lens Flares
LE with bright lights can sometimes cause ugly lens flares to show up. A 30+ second photo with the high intensity of the sun just causes too much internal reflection in your lens sometimes. This can be sometimes be mitigated using a polarizing filter. It can also be controlled to some degree by adjusting the composition of your shot. But unfortunately the only answer on occasion is to edit it out in post-processing, so look for it in the field while chimping and be prepared.

Long Exposures Can Make it Worse
Photo used in the last tip for the lens flare isn't a very good example of LE photography. I chose it because it has the lens flare, but the reason I don't like it because it's a tad boring. That large expanse of water just overwhelms the shot. The patterns in the water and the structure of the sunlight reflections are all lost. This is a case where I felt that the short exposure is much more pleasing that the long exposure.

Here's another example. The 5 second exposure doesn't capture the action and power of the ocean. It's just a bit too soft. The shot taken at 1/3 second does a much better job of bringing the waves and splashes to life, especially on the bottom left.
 5 seconds, waves are blurred |
 1/3 second, greater motion and drama in the waves |
The lesson here is don't have LE blinders one. Mix it up, take some shorter exposures too because as you're learning to play with LE techniques you're going to make mistakes and sometimes you'll find that the short exposure works better. You'd rather come home with a couple keepers than an entire shoot of stuff you want to throw away as a learning experience :)
More Post-Processing
You'll find that many LE shots don't work well with your camera's auto white-balance (WB). I suspect that the camera sometimes gets it wrong because an LE shot is a combination of light over time, where the camera is attempting to guess the correct WB for a short instant in time. So learning about WB correction in post-processing is critically important. This just another reason you should shoot in RAW.
Colors can also sometimes appear more dull and muted in LE shots too. Again, movement in the scene blurs the entire color palette together and things tend to gravitate toward grays. Playing with the vibrance and saturation will help.
Try Black and White
Another fun option for LE work is black and white. B&W is all about patterns, shapes, contrasts, etc. These are all things that LE photos can bring into view in novel and unique ways. And with B&W you can minimize the effects of muted, dull colors as described above.
Last But Not Least - RGND Filters
I already mentioned the importance of using GND filters above and how to simulate them in post-processing. Another filter you might want to look into are reverse GND filters. These filters are also quite simple to simulate in post-processing too. If you're expecting to simulate a RGND filter in post, you'll usually expose for the brighter areas of the shot (around the horizon when the sun is low). This frequently can leave your foreground too dark. I've added two Lightroom presets you can download that will simulate RGNDs for you as a starting point. Once applied, you would just need to adjust their position on the shot, and tweak the exposure to fit your preference.
I have a Lightroom preset the simulates a reverse GND filter. You can download it here.
I hope these tips will help you in your journey to experiment with long exposure photography. It has quickly become on of my favorite techniques and if you choose to try it yourself, I hope you find the results rewarding.
I learn easiest by example. I follow a number of very talented LE photographers and I get inspiration on a weekly basis. I encourage you to seek out other experts that use this technique and follow them if you're interested in learning more. You can also take a look at more examples I have posted and you can view it in a slideshow too.
Good luck!


Jeff Smallwood
7/16/13
5:28 PM
http://www.jeffsmallwood.com/index.cfm/blog/view/id/103