|
Stacking and Bulb Ramping
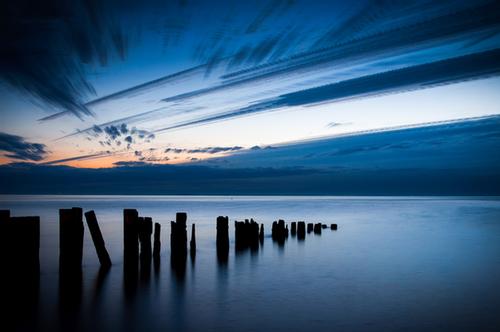
If you aren't familiar with the term bulb ramping, it's the technique of varying the length of exposure (shutter speed) over time as the light in a scene changes. It is an idea technique to use when capturing time-lapse photography outdoors as the light will vary, especially when around the transitions of dawn and dusk. The usual output from a series of bulb ramped shots is an animated time-lapse. But those shots can also be stacked to simulate extremely long exposures. The shot below is stacked from 84 separate photos, ranging in shutter speed from 30 seconds down to 5 seconds. The entire series took almost 13 minutes to shoot.
I've captured a lot of long exposure photography, and using neutral density filters is the ideal way to capture very long exposures at once. Stacking shots like this has numerous disadvantages and is something I would not recommend on a regular basis. However, one advantage this technique has is that it allows you to capture movement in a scene over a much longer period of time than is possible with filters. Another advantage is that as each shot varies in shutter speed, the exposure of each photo remains about the same which will help preserve contrasts, brightness, and color. HowThis technique was done using Lightroom and Photoshop, but the same can be accomplished using other tools like Photoshop Express. Basically, any editor that has layers and allows you to adjust the blending of each layer will work. Shooting the images was done with the camera mounted on a tripod and set to aperture priority (Av) mode. This is so the camera will automatically adjust the shutter speed as the light changes (which is did in this shot of sunrise). Once you've got the photos captured, follow these simple steps: 1. Select the photos you want to stack (I did this in Lightroom), and open them as layers in Photoshop. 2. One opened in Photoshop, select all the layers and change the blending mode to "darken" or "lighten". Which mode you choose depends on the light. The shot above used "darken" because the clouds were darker than the sky and I wanted to preserve the dark areas of each shot. However, if this was during the day and the clouds were lighter than the sky (or if I was going to star trails), then you'd use "lighten" mode. 3. Flatten the image and save it. That's it! If you have too many photos to stack and not enough memory to open them all at once, do it in batches (i.e. 10-20 at a time). Flatten and save each stack, then open all the stacked images when you're done and follow the same steps. This image was done in three batches because my laptop doesn't perform well if I try to open 84 RAW images at the same time :) I stacked the first 30, the second 30, then the remaining 24, then stacked the resulting 3 to produce the final image. Give it a try at any hour of the day or night to see what you can come up with. But the most dramatic scenes happen at sunrise and sunset. Comments
There are no comments on this post. Be the first one to comment using the form below.
Add Comment
|
Topic List
adventures
business
calendar
copyright
digital editing
equipment
event
facebook
free
google
internet
lightroom
microsoft
opinion
philosophy
photoclub
photography
photoshop
poetry
presentation
promotion
software
technique
technology
Search
Posts By Date
Recent Posts
Latest Photos
|